Thank you for purchasing HTVRoNT Automatic Heat Press 2 - Smart. Before using this product for the first time, please read this user manual carefully and keep it properly for future reference.
| HTVRONT Automatic Heat Press 2 - Smart ×1 Teflon Sheet×1 | |
| Heat Press Mat×1 | User Guide Envelope ×1 |
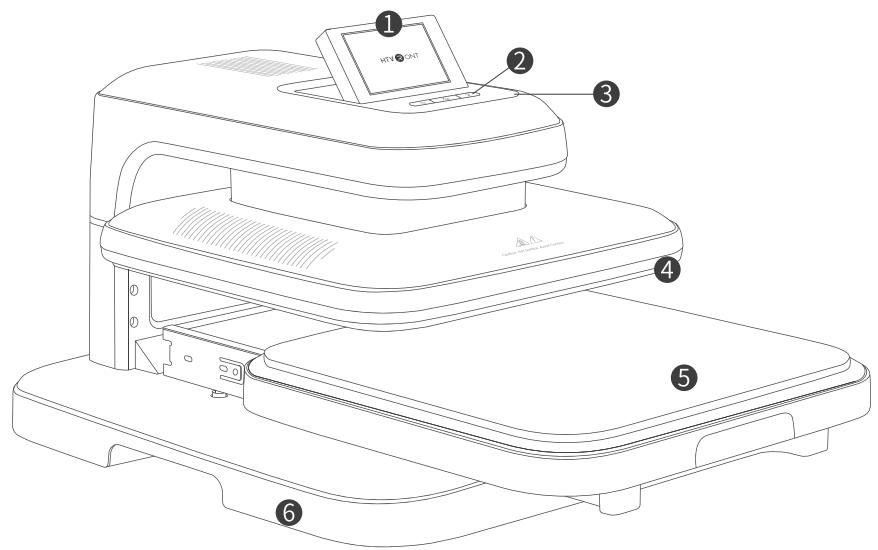
- Touch Screen 2. Buttons 3. Indicator Ring 4. Heat Plate
- Ironing Board 6. Base
¶ Details of Buttons
¶ Functions
¶ Power

Aer powering on, the "Power" button flashes white. Press the "Power" button once to turn on the device, and the touch screen wil flip and ascend. The "Power" button lihts white afterturnig on; n net ill original position.

¶ Memory mode
The selected material and substrate will be remembered for the next operation.

¶ Auto turn-off
This device will turn off automatically if there's no operation in 15 minutes. There will be beeps, and the "Power" button flashes white in the last 10 seconds before the shutdown.
¶ Home
Press the "Home" button once to return to the "Home" page and stop the ongoing ironing task.
③
¶ Start
Pes the "Start" butn nco ronautoatially with a coownThe "Start buton fashes d when preheating, then turns green once it reaches the set temperature.

¶ Emergency stop
Press any physical buttons or tap "Stop" on the screen to stop ironing, and the heat plate will stop descending and back to the original position.

¶ Back to the default setting 210°F, 20 s, 20 kg/50 lb)
¶ Details of Indicator Ring
¶ Auto ironing
Press the "Power" button for 5 s to turn off the device and reset the settings.
¶ Details of Indicator Light
Turn on the "Network" to update the firmware.

After setting, tap "Auto" on the screen to start automatic ironing. Once the ironing board is pushed back into place, the device will press down on the project continuously without tapping "Start." Tap "Auto" again to exit.
¶ Firmware update

| Color | Status |
| Green | The device is powered on;The device has reached the set temperature. |
| Red | The device is preheating. |
*
¶ Remote APP control
Connect the phone to the device via BLUETOOTH® and operate it through the mobile app.
| Buttons | Color | Status |
| Power | Flash White | The device is standing by;Te devic ibo o t. |
| Power & Home | Flash White | The device is connecting via BLUETOOTH®. |
| Start | Green | The device has reached the set temperature. |
| Flash Red | The heat plate is descending when not reaching the set temperature;The device is malfunctioning. | |
| Red | The heat plate has not reached the set temperature;The device is ready to heat up. | |
| Flash Green | The heat plate is descending. |
movestope tou scren manallOherwhe reen may malfncon r us ues; asensur t's cerrohe toucsreen avoi age;
to release the handle in time to avoid scald.
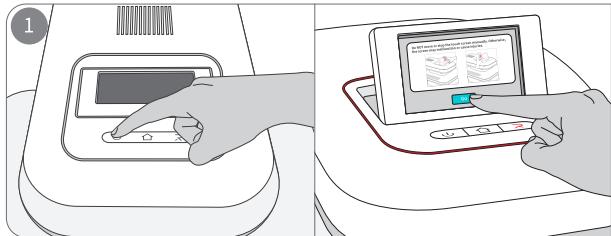
Power on the device and press the "Power" button once to turn it on (Default settings: kg/50 lb). The touch screen lifts up and displays the Beginner Guide page. Tap "I ve read and agree" to enter the "Home" page;
After the countdown, the screen heFi "Continue" t iron again or reset the ironing parameters to start a new ironing task.
¶ Touch Screen System
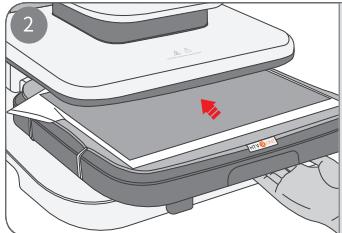
Pull out the ironing board and ensure there is a heat press mat. Place the substrate and material smoothly on the heat press mat in order. Fix the material with heat-resistant tape and cover it with the Teflon sheet. Push the ironing board back inside;
¶ Language
e Ia
Inits Tap "System" - "Units" to convert temp or pressure units(kg/lb).
Screen djustment
Tap "System," - "ScreenAngle," - "Ascend," or "Descend" to adjust the screen ange ntilyou stop tapping.
Tap "System" - "Screen Sound" to turn on/off the sound prompts.
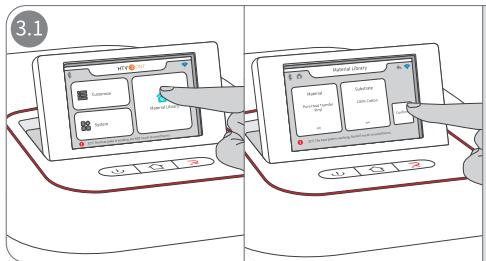
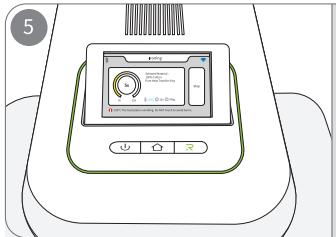
Tap "Material Library" to select the "Material" and "Substrate" accordingly. Tap "Confirm" to start preheating, and the "Star" button flashes red during the process.
Ta "SsNetork youtork.hisettnl pl p
¶ Firmware Updates
Tap "System" - "Firmware Updates" to update your firmware (*Please ensure the device is connected via network).
¶ BLUETOOTH
Tap "System" - "BLUETOO to connect the device via BLUETOOTH®. This setting only applies to device connection.
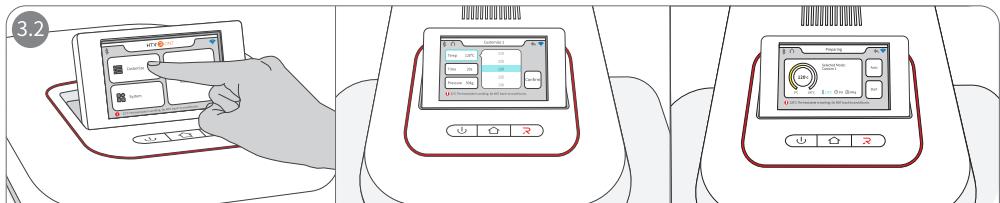
Custom Modes
100/210F,20 s,20 kg/50 b) t set the oni parames on demand.Thesettings will be saved automatically;
Tap "Confirm" to start preheating and the "Start" button flashes red during the process.
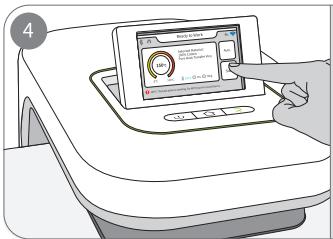
Once the "Start" button turns green and the screen shows "Ready to Work," tap "Start" on the screen or press the "Start" button to start the countdown, and the heat plate presses down;
Close supervision is required when this product is used near children.
HOUSEHOLD USE ONLY.
DO NOT IMMERSE IN WATER.
instructions that include the following information:
becoming entangled in or tripping over a longer cord;
a rvl when care is exercised in their use.
When an extension cord is used:
elecrical rating of the product;
being tripped over, snagged, or pulled on unintentionally, especially by children. 1 Do NOT use this product outdoors. It's ONLY for household use;
You can ONLY use this product on a flat, stable, and heat-resistant surface;
Keep the product away from flammables while in use;
while leaving;
5. Do NOT touch the heat plate after powering on to prevent burns;
6. Do NOT let the power cord touch the heat plate during the operation;
e ;
10. Do NOT immerse the product in any liquid;
/E/ contact HTvRoNT' s customer service if you have more questions;
customer service;
13. Children under 14 MusT have adult supervision while using the device.
¶ CLEANING AND MAINTENANCE
and wait for the body to completely cool before performing cleaning and maintenance.
clean it.
children.
¶ Q1: What to do if I cannot find my materials or substrates in the "Material Library"?
A1Try with similar materials or substrates in the "Material Library";
A2: Customize proper ironing parameters for your materials or substrates as needed.
¶ Q2: Why have my customized settings been cleared?
¶ Q3: Why does the device emit slight smoke?
AIt'ral hemsu yusumv ilpwhe;
.
¶ Q4: How to get a successful heat transfer result?
A1: Make sure you have followed the instructions correctly;
A: Make sure you have selected the correct materials and substrates;
or abri please ron them frst emove wrinkles beforeheat transferig;
A4: It is recommended to use HTVRONT's materials for the best ironing results.
¶ Q5: Why is my device making beep sounds?
B / A2: Beep constantly: the heat plate is pressing down;
Bny w /// he el tr e HTVRONT's customer service if this step doesn't work.
¶ Q6: What to do if the screen cannot descend/ascend accordingly?
A1: Cut off the power, re-power the device, and restart the device;
A2: Do NOT move the touch screen manually. Otherwise, the screen may malfunction;
A3: Contact HTVRoNT's customer service if the above steps don't work.
¶ 27: Why cannot I update my firmware via a network connection?
n speed: .
HTVRONT Automatic Heat Press 2 - Smart
| Model | HPA01-2 | Pressure | 20 -80 kg (50 - 170 lb) |
| Input | 220-240V~50-60Hz 1400 -1600W120V~ 60Hz 1500W; 100V~ 60Hz 1200W110V~60Hz 1260W; 220V~50Hz 1370W | Heat Plate Size | 38.1 x 38.1 cm/15 x 15 in |
| Temperature | 100 -210C (210-410°F) | Time | 1-999 s |
| Product Dimensions | 54.0 x 44.5 x 33.0 cm/21.3 x 17.5 x 12.9 in | Package Dimension | 58.5 x 48.5 x 38.0 cm/23.0 x 19.1 x 15.0 in |
| Product Weight | 20.0 kg/44.1 lb | Package Weight | 22.5 kg/49.6 lb |
¶ Q8: What to do if fail to connect the device via BLUETOOTH®?
A1: Ensure the device is powered on;
A2: Ensure the computer/phone's BLUETOOTH® is turned on;
A3: Ensure the device is within 5 meters around the computer/phone.
¶ A9: Where do I find the device's S/N code?
A1: You can find the S/N code on the right side of the device's base;
A2: You can find the S/N code on the device's package box.
¶ Q10: How to update firmware?
Connect he devic vi the network and follow the instructions n the pop- window o update;
A2: Ensure the device is powered on.
¶ Q11: How to check my firmware version info?
heevi Lh pahT the version info.
¶ HTVRONT Automatic Heat Press 2 - Smart Limited Warranty
T t warranty terms conflict withapplicable local laws and regulations, the local laws willtake precedence.
antlghose whot dertakehe treeuarantee aiwithout he pemission pany Meanhilesaispli a aantcarantienabil pru Tenaly
Scan the QR code below to download the HTVRONT app (*for phone and iPad):
Android