Thank you for purchasing the HTVRoNT Hat Heat Press. Before using this product for the first time, please read this product manual carefully and keep it for future reference.
| HTVRONT Hat Heat Press1 Hat Pressing Lid×1 | Ironing Mat×1 | |
| Insulated Safety Base×1 | Travel BagX1 | User Guide Envelope |
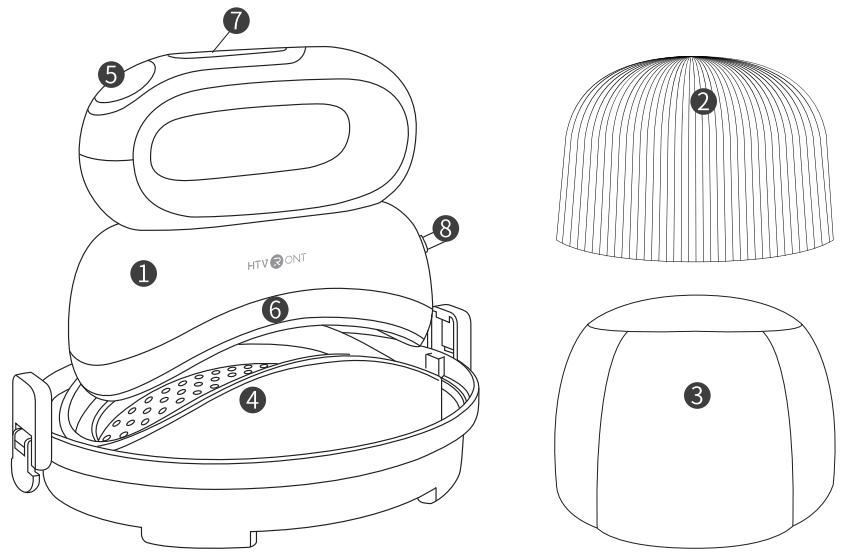
HTVRONT Hat Heat Press Hat Pressing Lid 3. Ironing Mat 4. Insulated Safety Base
- Digital Screen
- Heat Plate
- Buttons
- Power Cord
Time: 1 ~ 600 s Temp: 100 - 200°C (210 - 390°F)
¶ Details of Buttons
¶ Functions
¶ Power
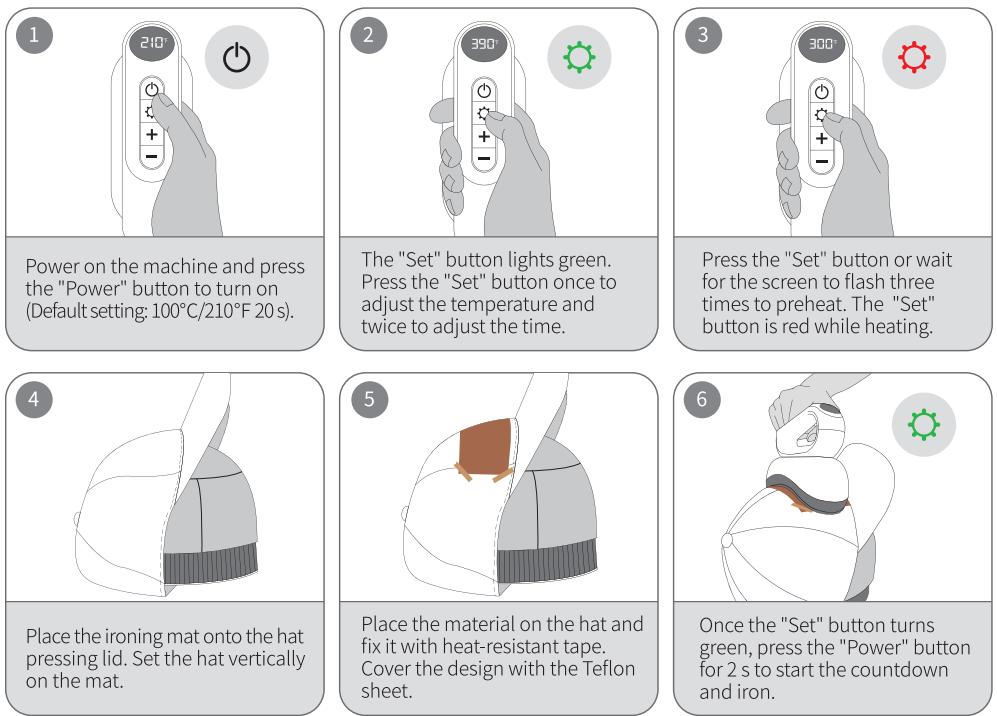
Turn on/off: After powering on, the "Power" button flashes white. Press the "Power" button to turn on/off the machine.
Countdown:After setting up the appropriate time and temp, ong press the "Power" button for 2 s to iron with the countdown.

¶ Set
Press once: The temp value flashes and adjust the temp with the or "-" button. resstwiceThe time value fashes nd ust the time ih or "-" button. . 4. Long press (for 3 s): To convert the temp unit -
¶ Memory mode
The set temperature and time will be remembered for the next operation.
¶ Auto turn-off

This machine will turn off automatically if there's no operation in 15 minutes. There will be beeps and flashing white lights in the last 10 s before the shutdown.

¶ Back to the default etting (100°C/210°F, 20 s)
Press the "-" button for 3 s, and the machine will turn off and reset. This function is not applicable in the setting process.
Increase
Short press (press once): Temp will increase by ; time will increase by 5 s.
¶ Decrease

.Short press (press once): Temp will decrease by ; time will decrease by 5 s. L t
¶ Details of Indicator Lights
| Buttons | Indicator Lights | Status |
| Power | Light White | The machine is turned on. |
| Flash White | The machine is powered on. | |
| Set | Light Green | Available for the temp and time setup.The heating is finished. |
| Flash Green | The machine is cooling(The set temp is lower than the real-time temp). | |
| Flash Red | The machine is heating. |
Check more step-by-step tutorial videos here: www.loklik.com/tutorialvideos If you have any questions or concerns, please check our official website: www.loklik.com
| Materials | Textile | Temp | Time | Pressure | Note |
| Basic Heat Transfer Vinyl | 100% Cotton, Polyester, etc | 145°C/293°F | 15s | Heavy | Cold Peel |
| Glitter Heat Transfer Vinyl | 100% Cotton, Polyester, etc | 150C/302°F | 15 s | Heavy | Cold Peel |
| Holographic Heat Transfer Vinyl | 100% Cotton, Polyester, etc | 150C/302°F | 15 s | Heavy | Cold Peel |
| Chameleon Heat Transfer Vinyl | 100% Cotton, Polyester, etc | 145°C/293°F | 15 s | Heavy | Cold Peel |
| Metallic Heat Transfer Vinyl | 100% Cotton, Polyester, etc | 140C/284°F | 10 s | Heavy | Cold Peel |
| Printable Heat TransferVinyl | 100% Cotton, Polyester, etc | 145°C/293°F | 15 s | Heavy | Cold Peel |
| Reflective Heat Transfer Vinyl | 100% Cotton, Polyester, etc | 150C/302°F | 15s | Heavy | Cold Peel |
| Flock Heat Transfer Vinyl | 100% Cotton, Polyester, etc | 150C/302°F | 15s | Heavy | Cold Peel |
| Puff Heat Transfer Vinyl | 100% Cotton, Polyester, etc | 155°C/311°F | 15 s | Heavy | Hot Peel |
| Heat Transfer Paper (Dark) | 100% Cotton | 160C/320°F | 20 s | Heavy | Cold Peel |
| Heat Transfer Paper (Light) | 100% Cotton | 160°C/320°F | 20 s | Heavy | Cold Peel |
| Sublimation Paper | Polyester, Cotton≤30% | 200C/392°F | 40 s | Heavy | Hot Peel |
¶ Precautions
- Do not use this product outdoors. It' s only for household use;
This product has to work on a stable, flat, and heat-resistant surface; - Keep the product away from flammables while in use;
ee power cord while leaving; - Do not touch the heat plate after powering on to prevent burns;
- Do not let the power cord touch the heat plate during the operation;
Donot let the heat plate touch the hat pressing lid directly during the operation to avoid melting; - Do not immerse the product in any liquid;
ru lease waitntil he aci cpletely col beoestor wy; - Please unplug the power cord after use or before cleaning the product;
When there e beeps and "E1" r "E2" n the screen, pleas cut the powmeiately nd restar.Feel free to contact us if you have more questions;
If the product is malfunctioning or damaged, please stop using the product immediately and contact LOKLiK's customer service; - Children under 14 years old MuST have adult supervision while using the machine.
HTVRONT Hat Heat Press
| Model | HPH01(HPH01-K) | 120V~ Input | 60 Hz 220 - 240V~ 50 -60 Hz | 300 W 540 - 630 W | |
| Temperature | 100°(210°) - 200°C(390°F) | Time | 1-600 s | ||
| Product Size | 20.6×16.5×16.0 cm (8.1×6.5×6.3 in | Package Size | 34.5×27.0×20.1cm (13.6×10.6×7.9 in) | ||
| Product Weight | 1.0 kg(2.2 lb) | Package Weight | 1.8 kg(4.0 lb) | ||
¶ Q1: Why cannot the buttons react accordingly?
A1: Make sure the machine is powered;
A2: Cut the power and restart the machine;
A3: Follow the instructions strictly while in use.
¶ Q3: Why does the machine make "beep" sounds?
A1: Beep once: the machine is powered, the countdown ends, or when it automatically shuts off;
A2Beep constantly with "E1" or "E2" on the screen: cut the powerimmediately and restart the machine.
¶ Q4: What to do when the machine stops working suddenly?
A1: Check if the machine is powered;
A2: Cut the power immediately and restart.
A1: Press the "Set" button for 3 s to convert the temp unit .
Q5: What to do when there are beeps and "E1" or "E2" on the screen? A1: Cut the power immediately and restart.
¶ Q2: How to convert the temp unit?
¶ Q6: Why cannot the hat fit tightly to the ironing mat?
A1: Place the hat vertically with the brim facing upward on the ironing mat;
Release the hat buckle and adjust accordingly.
¶ Q7: How do you make sure the successful transfer results?
A1: Make sure the time and temp settings are suitable for the materials;
A2: Make sure the hat is perfectly fit to the ironing mat;
A3: Make sure the design is tightly fixed to the hat;
A4: Cold peel off the protective film.
¶ Q8: How do you fix the design on the hat?
¶ HTVRONT Hat Heat Press Limited Warranty
The warranty per this machi se yrromhe at purhase.Othr Laccesori l . proof of purchase.
malfunctions caused by improper use, maintenance, and storage by consumers; malfunctions caused by majereMeanwhile, LLdisclaimsalmplie gal warranties, including warrantmerhantaliy p e.ln warranty.